How to change your vehicle's turn signal bulbs and upgrade to LEDs

A video tutorial with topics including how to change bulbs in 5 minutes, and how to upgrade your turn signal bulbs to LEDs with a load resistor.
How to replace the turn signal light bulbs yourself in 5 minutes
Has your turn signal bulb finally burnt out? Or if you own a Lexus GX SUV like me, the question might be better worded has it burnt out again? Anyone who has ever had to replace their turn signal knows the dealers typically charge $75 or more to change bulbs that sell for $4.00 a pair in auto parts stores.
Also, in the case of my older model year Lexus SUV, many people on Club Lexus have posted all sorts of complicated turn signal light repair instructions, causing folks to waste an hour or more needlessly unfastening plastic engine shields to get at these hard to reach turn signal lights buried low in the engine compartment inside the headlight housing assembly.
We have a much better solution for you to perform this simple replacement yourself and save repair costs from the dealers or repair shops. You won't waste time on repair methodologies that others might suggest to you. You just need to be willing to spend 5 minutes lying on your back.
Our solution involves reaching from underneath the front end of your vehicle and completing the job in 5 minutes. Although this video below is specific to Lexus and Toyota SUVs, it may apply to many vehicles, so hopefully you can take advantage of our tips for this quick repair.
Video tutorials showing replacing turn signal bulbs and upgrading to LED
After I posted a solution to the problem of changing turn signal bulbs on the Club Lexus Forums a few years ago, the response was so overwhelming positive from numerous people who had no idea the 5 minute fix was so cheap and easy. Many people have requested that we make a video showing how to do this simple repair, so here it is:
The photos and steps outlined below show you the same quick steps from the first half of our video above to replace your blinker bulbs all by yourself. These instructions are the same for the left side and right side directional signal lights.
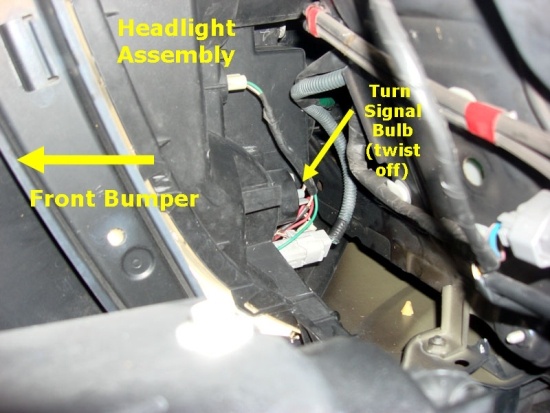
1) Lay down on your back with your head resting on the ground just underneath the front right headlight of your vehicle, with your legs and body sticking out of the front of your car. See the photo below, look upward behind the front bumper to the right where the headlight housing is and the photo shows where the turn signal light bulb is located.
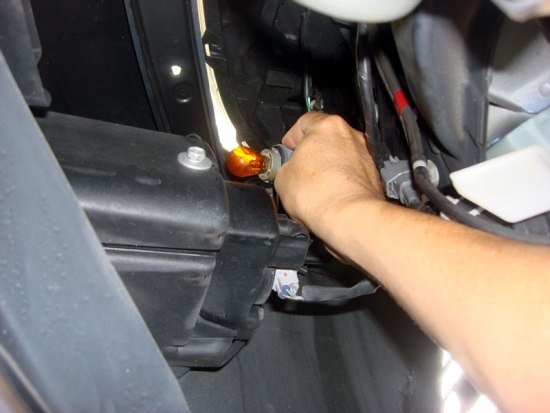
2) Reach up and grasp the light bulb socket and turn it 90 degrees counterclockwise (left) until it loosens and pull the socket containing the light bulb out of the plastic headlight housing. Now to remove the old light bulb, push in and twist the burnt out light bulb, or if yours is a pull out bulb, just pull it straight out of the socket. Your now-empty socket will look similar to this photo below:

3) Now install the new bulb in the reverse method that you removed the old bulb, push in and twist the bulb until it clicks into the socket. Common bulb types for turn signals are 1156 and 1157 which are twist type bulbs, and 3157 or others which may be a pull out type of bulb. Twist the light bulb socket back into the headlight housing until it clicks and you are done.
How to upgrade your turn signal light bulbs to LEDs
The above video actually contains 2 tutorials. The second tutorial is a bit more advanced and shows you how to convert your turn signal light bulbs to LED, and all of the technical considerations, caveats, and scams to avoid, which we'll also explain below. Then hopefully you'll never have to change your bulbs again and they will look perfect for 50,000 hours of use.
If you're tired of changing out your old glass incandescent turn blinker lights every few months like me, and dealing with the fading amber glass bulbs, then you can upgrade your light bulbs to LED bulbs which last 50,000 hours. Many of the older glass amber bulbs also start to turn black after a few months. LEDs on the other hand are a bright consistent amber color, with SMD (Surface Mount Device) LED chips, that look the same on the first day as they do 2 years down the road.
Why you can't just substitute an LED bulb for your old glass filament light bulb
Let's look briefly how your car's turn signal ECU (Electronic Control Unit) works. It senses how much power the light bulb is drawing from your vehicle's electric system and blinks normally when everything is fine. When you turn on your turn signal blinker or hazards, your ECU flashes the bulb about every half second.
But when your bulb burns out, the ECU notices there is no power being drawn and begins hyperflashing, meaning it flashes your signal lamps very fast. This is how you know it's time to change your light bulb. LED bulbs have a different resistance than incandescent bulbs
Newer LED bulbs draw much less power than the regular glass bulb that your car maker designed your car with so, almost everyone who drops in a new LED bulb will notice hyperflashing because the LED bulb is not acting like the ECU is expecting it to act, and the load resistance of an LED bulb is different than your old bulb.
The lower power and mismatched resistance of the LED lights tricks your ECU into thinking there is no bulb there. This is the reason why people complain of hyperflashing when they install LED bulbs. What you need to do then is to trick your vehicle's ECU into thinking that your newer LED bulb has the same resistance and power consumption as the bulb you are replacing.
The solution is to add a load resistor when you upgrade to LED bulbs
When you upgrade to the LED bulbs, you just need to make sure you connect a load resistor across the wires feeding the turn signal light bulb. You must do this for every bulb that you want to upgrade, or your turn signal flasher unit will hyperflash the lights quickly.
The photo below shows our test setup with a standard 50 watt 6 ohm resistor with an orange metal heat sink on it. You can buy them on eBay or Amazon for just a few dollars. Make sure they come with the red plastic crimp connectors, which allow you to connect this resistor across light bulb supply wires, usually right at the base of the lamp.
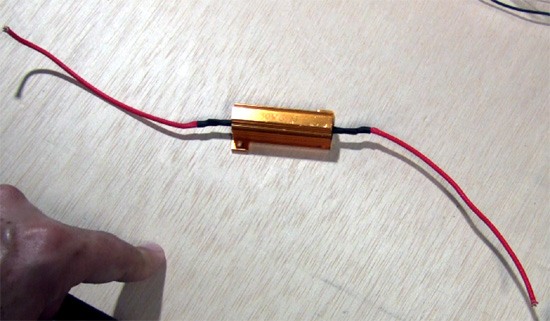
Don't worry about which direction you need to wire up the resistor. Unlike capacitors, which have a positive and negative polarity, the load resistors have no polarity so it does not matter which end of the resistor is connected to which of the 2 light socket wires. Either direction is fine.
How do I connect my load resistor to a bulb with 3 wires?
If you have a double filament light bulb with three wires (instead of 2 wires) that you are replacing, you'll have to experiment to see which 2 of the 3 bulb wires to crimp the resistor across. It is usually the 2 outside wires, while the middle wire is a typically a dimmer wire, but you can't be 100% certain with all lights; it will require some trial and error.
If you can get a PDF file of your vehicle's service manual, you can find the electrical system diagrams. Then you can see if they have tables decoding the wire colors and what they mean, or if the wiring diagrams offer you any insight into how the wires are routed. This might be overwhelming for some of you, but that's alright, only the most adventurous of DIY folks will have the service manual anyway.
Installation instructions for connecting the load resistor to your LED light bulb
By placing this load resistor across the LED bulb, it tricks your car's ECU into thinking it's similar to the resistance of the bulb it replaced and your turn signal will flash at a normal rate. As our video above shows, it's pretty simple to crimp the load resistor across the light bulb's wires, just crimp one end of the resistor wire onto one bulb wire.
Then, you just connect the wire on the other side of the resistor across the other light bulb wire. Each light bulb will require 1 resistor and 2 plastic crimp connectors. Upgrading both your left and right front flashers will require 2 load resistors and 4 crimp connectors.
The most important step is getting the crimping of the resistor wires right
I can't stress enough the importance of getting the resistor properly crimped onto the light bulb wires. Make sure both wires enter and exit the crimping connector through their own little tunnel and that they are both parallel in their own tunnels.
You must use pliers to squeeze down on the metal shunt on the crimp so that it pierces both wires thoroughly and evenly, and creates the short circuit between the 2 wires.

After you use the pliers to crimp the wires, snap the plastic lid on the crimp connector closed to hold the connection together. If your lights still blink fast, it means you did not make a good crimp connection, and you need to go back and retry the crimp.
I suggest buying extra crimp connectors in case, because once they are crimped, it's hard to redo it if it was not crimped correctly. You can do just the front lights first if you like, and if successful, do the rear lights later. As long as each LED light bulb has a resistor, the ECU will think it's the older bulb that the car was designed to use.
This photo below shows the finished product, the LED bulb before it is replaced back into the light housing. You can see the load resistor crimped onto the supply wires and hanging in place. If you have any metal frame within reach, you should use self-tapping screws to attach your load resistor to the metal frame for better heat dissipation and reliable installation.
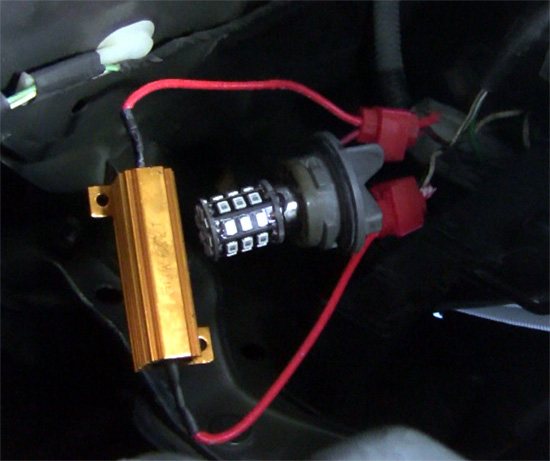
In my case, the somewhat short resistor wires would not allow the resistor to reach any metal frame parts on our vehicle, so I just left my resistor hanging. You can also use zip ties to tighten everything together by the wires to minimize movement. Don't place these load resistor heat sinks up against anything plastic, or against any wires because the heat sink gets scorching hot with 2 amps or more flowing through it and it can melt your wires.
Warning: Watch out for LED bulb resellers claiming you don't need a load resistor
One problem we uncovered, which you'll see on our video above, during our testing and investigations into upgrading to LED is that there are sellers on eBay and Amazon who are falsely claiming their LED bulbs are "error free" and that you don't need the load resistors.
We found the hard way these claims of "no resistor required" were false and, in fact, unless you have a known LED compatible flasher module then you must indeed use a high wattage load resistor with a heat sink for the reasons we mentioned above.
These misleading resellers use this bogus nonsense as a reason to justify charging you double the price, $40 per pair of LED bulbs in our case. This is a stark contrast to the $15.99 per pair JDM Astar superbright amber LED turn signal bulbs that we eventually bought, which do require an external load resistor.
There is no way that there are any high wattage resistors built into any "error free" LED bulbs which you could expect to carry the amount of current of the 50 watt external load resistors with those massive metal heat sinks. Some people get lucky and the LED bulbs work without a load resistor, mostly because their later model vehicle turn signal ECU is already LED compatible. In those cases, it's not because of any resistor built into the LED, it's just the LED compatible flasher unit.
An alternative to using load resistors: an LED compatible turn signal flasher
If you don't like the idea of crimping load resistors onto your car's wiring, the alternative is to get a turn signal flasher unit that is compatible with both filament bulbs and LED bulbs. But the work involved is just as much, if not more, because most vehicles you have to unscrew half of your lower dash access panels to get at your flasher relay module.
Back in the seventies and eighties, you could just reach underneath where your pedals are and find the flasher, pop it right off, and replace it with a new one in 2 seconds. Those days are long gone. I still don't understand why car makers are so shortsighted and make the turn signal flasher so hard to get to. In our Lexus GX SUV for example, it takes about 20 minutes to undo all the lower dash.
It then takes another half hour to coax the flasher off the back top side of the fuse panel, which means destroying the plastic latch holding it down on the fuse panel. It is buried deep where your hands have no mobility. Good luck, Mr. Phelps.
After dealing with the difficulty of removing your directional flasher unit, you now have to be faced with auto parts web sites that incorrectly claim their flasher part is made for your car. My flasher unit is a big 2-inch by 3-inch module, but after pulling up my vehicle and model year on Autozone, their product page for the flasher showed this tiny 8-pin 1-inch cube and they stated it was compatible with our car.
This of course is wrong, and our flasher is a 12-pin connector anyway, so be wary of this when you shop for an LED compatible flasher module. If you decide to buy a new flasher unit, pull out your old one, and get the part number off it and search online for cross reference part numbers that will fit, and confirm their photos are of a part that will work correctly in your car, truck, or SUV.
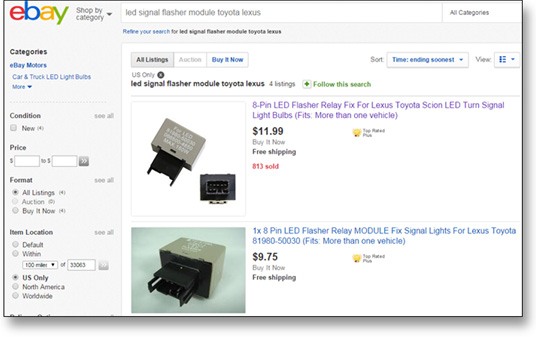
For most models of vehicles such as Lexus and Toyota SUVS for example with similar parts, you can see from the screen shot above these LED compatible flasher units are all over eBay, stating that they are guaranteed to be error free or they are drop in decoder replacements. This is what you need for your vehicle in order to avoid using load resistors.
If you can find an LED compatible flasher for your car and get it installed, your job will be done, and you can simply swap out your old bulbs for LED versions without the need for using any load resistors to balance the load of the LED lamps.
Good luck with your upgrade and let us know about your success changing and installing your new LED turn signal lights.

About The Author: Jeff Ostroff
A lifelong consumer advocate with over 20 years of unparalleled expertise, Jeff is the Founder, CEO and Editor-In-Chief of CarBuyingTips.com. As chief consumer advocate, he oversees a team of experts who cover all aspects of buying and selling new and used cars including leasing and financing.
For decades, Jeff has been the recognized authority on vehicle purchasing, sought out often by the media for his decades of experience and commentary, for live call-in business radio talk shows and is cited often by the press for his expertise in savvy car shopping methods and preventing consumer scams and online fraud. Jeff has been quoted in: CNN, MSNBC, Forbes, New York Times, Consumer Reports, Wall Street Journal and many more.
Jeff also has extensive experience and expertise in new car brokering and selling used cars for clients on eBay and Craigslist. Connect with Jeff via Email or on Twitter.